

Why bother with a 2-piece placket? Beyond that it's fast, easy and can be done completely at the machine, countless design opportunities exist. Because the overlap and underlap are separates pieces, they can be cut from different fabrics and the directions of the grainline of one or both pieces can be changed to achieve a unique look.
Rather than a one piece placket made from a single square piece ot fabric with an array of fussy difficult angles and edges to turn, this method uses 2 rectangles to which a single seam allowance is added to one side of each piece. The 2 simple pattern pieces are shown below on a 1" grid for you to copy.
Now let's make a perfect placket!
(Please note that I am writing this tutorial as if you have never made a sleeve placket before. I am going to show it to you one very detailed step at a time with many detailed photos. So, at first glance it may seem complicated, but in reality after your first practice-placket it just takes 5 minutes --or even less-- to complete)
First, you will notice that I am demonstrating this method using two rather "soft and spongy" quilting cottons that are not of the best quality... not bad, but rather thick as compared to traditonal shirting fabric. Why? It was a good way to clearly show the right and wrong sides of the fabrics for demonstration purposes, and I wanted you to see that even on lower-priced fabrics, you can get great results.
PLACKET PATTERN-- grid is 1" square.
On Placket Pattern- Broken lines are stitching
lines, solid lines are fold lines,
angle lines are slash lines.
angle lines are slash lines.
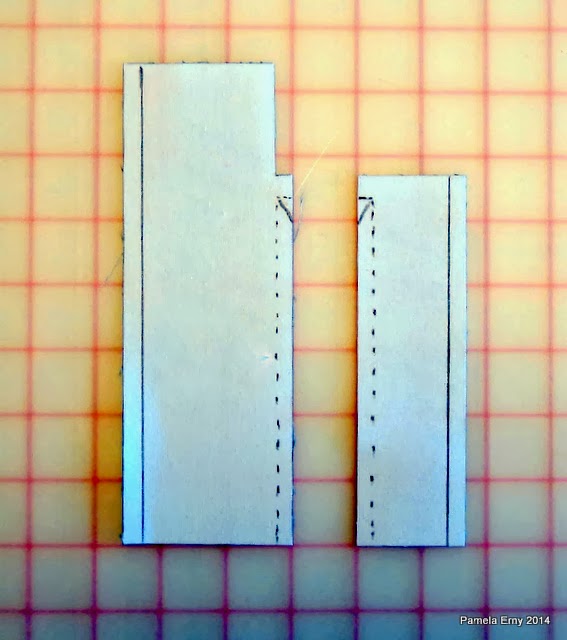
NOTE--
Pattern and Slit Length are based on a 1/4" sleeve-to-cuff seam allowance.
If your pattern has 5/8" seam allowances, lengthen the Placket Pattern (at the bottom by about 3/8", and cut the sleeve-slit about 3/8" longer. That said, please remember the length and width of the placket (and accompanying slit in the sleeve) is not set in stone. Make a sample placket and change the dimensions if you want to do so.
Cut the PLACKET Pieces from fabric--- Cut 2 of the larger (overlap) placket, right sides together. Cut 2 of the smaller (underlap) placket, right sides together. Try very hard to cut them as straight as possible.

Now Place one Sleeve
WRONG side up, and cut the slit that was marked on your pattern piece. Cut it 5" long. Yes really, cut it now...trust me, I know what I am doing. <smile>

Next, the placket pieces will be sewn to the sleeve slit...RIGHT SIDE of Placket to WRONG side of SLEEVE.
An easy way to remember this at this stage is that ALL
of your pieces, Sleeve and both Placket Pieces will be WRONG Side
Up. So....if all you see facing up at you are the wrong sides of everything....you
are doing it right!
Pam's Tip-- Remember that in every single sleeve
placket that you will ever sew-- The “Little” Under-lap placket
piece will be placed on the “Little Side” of the slit (where
there is only a “Little” bit of fabric toward the edge of the back
side of the sleeve), and the “Big” Over-lap Placket piece will be
placed on the “Big Side” of the slit (where there is a “Big”
amount of fabric toward the edge of the front of the sleeve.) So if
you always have these 2 things in mind,your plackets will be sewn
correctly--
- Little placket goes on the Little Side, Big Placket goes on the Big Side.
- Everything you see you at this point is Wrong side up.
Let's Stitch!

Stitch the (little) under-lap placket piece to the
sleeve-slit, matching the stitching line edge of the placket piece to
the sleeve slit, as shown above.
You will start from the bottom and then
stitch until you are 1/4” above the end of the slit, then pivot and
sew to the edge of the placket piece as shown (and this is why we cut the slit first...it so easy to align cut edge to cut edge...no guessing). Remember...everything you see is wrong side up!
Then match the stitching-line edge of the (big)
over-lap placket piece to the other side of the slit,as shown above. Again...remember that everything you see is wrong side up!

At the machine, drop your needle into the *Corner*
of the previously stitched (little) Under-Placket shown above. (Have you noticed that everything is still WRONG side up? <smile> )

Then stitch across and onto the (bigger) Over-lap Placket
piece, as shown above. Stop stitching when you are 1/4” past the cut edge, then
pivot and sew down the remaining side of the sleeve-slit, matching
edge of placket to edge of slit, stitching a 1/4” seam.

(Please ignore that stray cut piece of
thread....it means nothing but sloppy photography....sorry)
Now snip from the center into the corners (through all thicknesses) as
shown. It is essential to snip into the corners as close to the
stitching as possible, even if you snip a teeny-tiny bit past the corner
stitches! Otherwise you will have a puckered placket...and we don't
want a puckered placket, now do we? So be brave and SNIP!

Then as shown above, bend the snipped triangle up, and crease it
with your fingernail, or press it in place with an iron.

Now turn everything through the slit to the RIGHT side
of the sleeve. Now we will be working from the RIGHT side of our
sleeve. In each of the following steps, you will be seeing and
working from the RIGHT Side of the Sleeve.
Pam's Tip--
Look! The Little Placket is still on the Little
Side of the Sleeve, and the Big Placket is still on the Big Side of
the Sleeve...always remember that, and you won't mix them up!

Move the (little)
Under-placket so that you can see the top of the stitching line
(which is the bottom of the slashed triangle), and mark a (removable)
line that is about 1-2" long as shown above.. It will be used a reference point
later. You can see my yellow chalked line in the photo, above.

As shown above, flip the “Big”
part of the sleeve up and out of the way so the Under-Placket is
exposed. This will make it easier to work with as we continue.

Press the seam
allowances toward the placket-piece, as shown above. You can do this with
an iron, or as many professionals do....by briskly stroking the allowances a few times with a fingernail.

Then fold the free edge by
1/4” as shown above, and press it (or crease it firmly with your fingernail).

Next as shown above, fold the placket over
so that the edge (that you just folded by 1/4” and creased), barely
covers the line of stitches. Press the newly turned edge firmly with an iron or your fingernail.

Finish constructing the
Placket Under-Lap as shown above, by stitching it closed as close to outer edge as
possible. Notice that this stitching extends just above the yellow chalk line.

Bring the previously
“flipped out of the way” part of the sleeve back down (covering
the completed under-lap) so that the (big) Overlap Placket and its
stitching is visible, as shown above.
Then, like was done with the
Under-placket, mark a (removable) line at the top of the stitching
line (which is the bottom of the slashed triangle).
It will be used a reference
point later. You can see my yellow chalked line in the photo, above.

Just like what was done with
the (little) Placket Under-lap...Press (or crease) the seam allowance
toward the placket-piece, and then fold the free edge by 1/4” and
press it (or crease it firmly with your fingernail).
^ When these steps are
complete, it will look like the photo, above ^

Next as shown above, fold the placket over
so that the edge (that you just folded by 1/4” and creased),
barely covers the line of stitches. Press with iron or crease with fingernail.
Notice the chalked lines,
they will be used soon...but next the “peak” at the top of the
(big) Placket Over-lap will be folded.
FOLDING THE PEAK --

Note—either side can be folded first)
Fold one side of the top of
Placket UNDER at an approximate 45-degree angle.
Don't let me lose you here,
it's easy...the following photos will make it more clear. For now,
just finger-fold one side under at an angle, but do NOT press/crease
it...yet. It should look (approximately) like this next photograph--

See the photo above? That was easy...one side
folded under!

Now.....fold the other side
UNDER the first fold.. After the this second fold, your
“placket-peak” will look approximately like this next
photograph--

The angles on the “peak”
shown above are pretty good, but I fiddled with one fold for a few seconds until the
angles were as perfectly even as my eyes could detect. In other
words, no one gets “perfect” peaks unless you have one of those
$$$$ auto-folding machines that they use at production shirt
factories. But you can get very very close by eye....and if
you want to use a triangle shaped cardboard template, go ahead...I just prefer not to.

While I don't usually use
templates, I do use a glue stick in some cases to make my
shirt-making life a little easier. So, after you are happy with your
folded peak and have pressed the creases (with an iron or your
fingernail)...feel free to dab a bit of glue-stick on the underside
of the peak. A little goes a long way...just a quick light dab...away
from the edges, fold it back up and then just “finger-press” it
down.
The
photograph below is here to make certain that THIS edge...the side that
covers the seam allowances...is the one that will be stitched closed when we finish the placket.

Now
let's finish this Sleeve Placket!

As shown above....DROP
YOUR NEEDLE.... at the MARKED LINE....on the “covered
seam-allowance” Side of the Over-Lap Placket (the side I
showed to you in the previous photo).
Start
edge-stitching up to the first “corner”
point......Pivot....stitch to the top of the
“peak”....Pivot....stitch to the final “corner”......

Then
Pivot again and stitch until you reach the Next MARKED LINE....then STOP as shown above.

Now Pivot at the MARKED LINE, and stitch straight across the placket through all layers until you meet the point
where you STARTED stitching.
And
then.....

…..PIVOT again, and edge-stitch all the way down, to finish the placket!
This
is what the finished placket looks like from the Right Side....
(of course, you will most likely be using matching thread..and you will have brushed your chalk line away!)

( Gee whiz...weren't those marked guide-lines handy?)
This is what it looks like from the wrong side--

And this is the placket shown open---

Before applying the cuff, trim the edges of the placket even with the bottom of the sleeve.
And yes of course you may work a buttonhole in the Upper Placket. You can easily do it now, after the cuff is attached, or before the final placket stitching is done. In my shop we work the buttonhole at this stage.
I hope you enjoyed this glimpse into my shirtmaking studio! I have many more "Custom-Shop" Shirtmaking techniques planned to share with you!
Thank you so much for this tutorial, Pam! It's incredibly clear and helpful, and the mnemonic for which side the placket pieces go on is exactly what I needed. My first attempt at a shirt definitely ended up with the placket overlap facing the wrong direction-- I wish I had these instructions back then!
ReplyDeleteClear, concise and eminently doable! Thanks, Pam.
ReplyDeleteAwesome tutorial. I love your technique!
ReplyDeleteVeronica
Thank you oh so much! This came along at just the right time for my need!
ReplyDeleteThanks so much for this tutorial. I have tried a few times to make a placket and was not happy with the results OR the process! I think I will try a practice piece using your method "just to see". Thank you again for sharing your processes.
ReplyDeleteThis is a wonderfully clear tutorial. David Coffin's book uses the same method if I remember correctly, but his diagrams are not so easy to understand. Thank you.
ReplyDeleteHi Nancy and thanks! David and I are friends, in fact I need to give him a call this week. While the placket he shows in his book can be cut in half to make it a 2-piece placket, the resulting pattern and mine are quite different, including the folding method. But, that said and with all due respect and warm professional regard to David....every Shirt-maker has his or her preferred way.
DeleteHi Nancy and Pam; yes, our methods are built on essentially the same origami or geometry, but it's fascinating to see how different the order of steps is here compared to what I came up with. Your methods of slashing first, and then stitching before folding, are obviously refined for maximum efficiency by generations of workroom practice; believe me, I'm taking notes! And I love the big-side, little-side mnemonic; I've always said, "Put the chimney in the middle of the sleeve," which I guess is maybe a visual hook rather than a conceptual one; again, fascinating differences, but yours seems much "stickier":)
DeleteSplitting the pattern into two simple rectangles also makes great efficient sense, but in that spirit, I wonder why you bother to complicate it with that quarter-inch cut-out on the overlap just above the stitching box; seems fiddly for no good reason. I mean, if you're going to let the overlap be a double layer all the way up to the triangle anyway, why take the time to trim away just that tiny edge? And if you are going to take the time, what not clip a little deeper and get rid of the double layer? (Altho since nobody will likely ever notice any difference one way or the other, removing the inner layer seems to me now to be worth the trouble only with the thickest fabrics, and maybe not even then.) That seems to me the only reason to bother to clip at all, pure speed arguing for basic rectangles on both sides, but I could certainly be missing something. Either way, this seems to me to be the only difference pattern-wise between my way and yours.
Explanation-wise, boy; ain't digital publishing grand? After decades of fighting with the budget for every square inch of print art, let alone full-color print art, the fact that one can now produce and deliver a virtually endless stream of big color photos for essentially no cost, and in far less time than it took me to create the crabbed little pen-line diagrams I was restricted to when working in my own lap still makes me giddy! A beautiful job, Pam; bravo! (And yes, you DO need to call me this week:))
Hi David.... typing this from the hospital...forgive typos. Yes. Indeed, haha!...I knew that if you saw the pattern pieces, you would wonder why I "notched-out" that seam allowance. :) In *usual* every day practice in my studio we cut or tear strips of fabric into widths, and then into lengths and use those -full rectangles- for the placket...without delineating a seam allowance..we just know it's accounted for, of course.
DeleteWith that said, etc, etc . Over the years when I've taught shirtmaking, showing that 1/4" as a notched-out seam allowance on the overlap piece has made it easier (by about 3-to-1) for students to both identify the overlap piece and accurately fold the peak.
So yep, I confess while the sew and fold is absolutely the same, we use full rectangles...churning them out at breathtaking pace as needed by tearing or rotary cutter...on the bias, near bias, straight, and cross grain.
Yet I still do stand by the exact pattern and method I showed here as being another professional alternative and one in actual use by at least 2 professional colleagues of mine, and a growing shirt-making factory located near South Bend Indiana....and me too, on the thickest fabrics ;) so....no prevarication was perpetrated, LOL! <3
Thank you, Thank you, Thank you. I love button down shirts with long sleeves but stay away from sewing them because of the placket and cuffs. You have just made it so easy. I have this wonderful shirt cut out (has been for about 2 yrs now) and didn't want to start it because of the sleeves. I can't wait to get started back on it now. I really appreciate your easy instructions on this. Thank you again.
ReplyDeleteThanks so much for sharing your wisdom. Hope to try this soon.
ReplyDeleteGreat tutorial, Pam! Thank you for the clear instructions :-)
ReplyDeleteFabulous! Great tutorial!
ReplyDeleteAs always, you are so generous and wonderful at sharing your skills and make each of feel like we can do anything. Thank you for the fabulous tutorial!
ReplyDeleteVery helpful! Thank you so much.
ReplyDeleteI also have been procrastinating sewing my cut-out shirt because I couldn't find a beautiful placket. Well, I've found one. Thank you so much, you've saved my sanity & also my new shirt (when it's finished). But I think I will do a practice run first to make sure I get it right.
ReplyDeleteYou are a life & sanity saver. Thanks so very much.
Bobbieann G.
great tutorial! i kinda love sewing tower plackets, but i'll try the two piece placket next time. thanks for this!
ReplyDeleteI want to thank you sooo very much. I also have a shirt that is waiting for me to do the sleeve placket & have been looking for ways to do it properly. Wow I really believe I can do it now with your very clear instructions. I'll always be indebted to you as I love wearing long sleeve shirts, either buttoned or unbuttoned with a tee underneath it. Again thank you so much as you have saved my sanity while trying other's instructions. Love all of your shirts & I have a large folder with all of your shirts & instructions. These instructions will go into the large folder. Thank you for your expertise.
ReplyDeleteI can't thank you enough. This is a wonderfully informative post on plackets. I so appreciate the time you put into this. I will be cutting out a shirt tomorrow just so I can try this placket.
ReplyDeleteThanks again.
As always, you rocked this tutorial. Many, many thanks!
ReplyDeleteVery helpful clear and detailed instructions & the photos are great too. I like this better than the Threads method. Thanks for sharing!
ReplyDeleteJen
Perfect timing, Pam! I'm about to cut out three wool shirts for myself and will definitely use this placket!
ReplyDeletePerfect timing. I'm about to cut out three wool shirts for myself and will definitely use this placket!
ReplyDeleteFabulously detailed instructions! So generous of you to share. Thanks :)
ReplyDeleteI don't know why I LOVE to have shirts with placket. I used to get tailor to put placket in sleeves or neckline of shirt I order. Now, I can sew and have been planning to make myself a simple shirt with placket in sleeves and neckline but always in doubt to give it a try. Your tutorial encourages me to take action. Thanks.
ReplyDeletePS: Which one of your blogs I should follow for more tutorial/info? This one or off-the-cuff-style.blogspot.com ?
Hi, and you are welcome! It will be best to follow this blog. I will be posting new tutorial and new shirt designs here and migrating my past tutorials from the other site to this one when I have a spare moment ;)
DeleteThank you so much Pam. I've just started following your blog and these are excellent instructions. I can't wait to try out some practice plackets. You make it look SO easy.
ReplyDeleteThank you, Pam. Few things are more satisfying than a well-executed placket.
ReplyDeleteA good addition to the techniques library. I, too, have been using David's method but this does look like it could be an interesting variation, especially with two different colors/prints of contrasting fabric. Thank you for showing it. Theresa in Tucson
ReplyDeleteAnother fabulous tutorial! Thanks so much, Pam.
ReplyDeleteWonderfully detailed tutorial Pam! Thank you very much
ReplyDeleteThanks Pam! I can't wait to practice this a few dozen times! Kate
ReplyDeleteLove the tutorial! Thank you!
ReplyDeleteThank you! Wonderful tutorial. I have made my husband several business shirts and made the plackets in two ways so far, knowing all along that there must have been a better way out there. Now I can't wait to try this and experiment with some different contrast fabrics/grainlines in the placket. Yay!!!!
ReplyDeleteThank you so much Pam for this. I will be making a shirt soon and this will be invaluable for me. BTW I tried your collar thread trick and it turned out perfect!
ReplyDeleteThank you so much Pam for this. I will be making a shirt soon and this will be invaluable for me. BTW I tried your collar thread trick and it turned out perfect!
ReplyDeleteOne question. Is there no interfacing on the placket pieces?
ReplyDeleteThis is fantastic. I love you, and I love your Shirt Crisp Fusible Interfacing!!!
ReplyDeleteBrilliant! This tutorial is terrific. Thank you so much!
ReplyDeleteBrilliant! Wonderful tutorial. Thank you so much!
ReplyDeleteThank you for this tutorial! Plackets always make my head spin a little. I've linked to your tutorial over at Craft Gossip:
ReplyDeletehttp://sewing.craftgossip.com/free-pattern-2-piece-sleeve-placket/2014/01/20/
--Anne
After reading through the tutorial, I can see that this is a great, and easy method to get good results. I have to make two men's shirts by the end of Feb. so will be using your method. Thank you so much.
ReplyDeleteThank you, thank you, Pam! I have fabric purchased, and a blouse muslin made for my daughter and have been delaying proceeding further because of the sleeve placket! I'm using a BurdaStyle pattern and the directions of those are pretty non-existent.. such as "sew the placket".. so I was scouring various books I have to find the best way to do this. Your tutorial could have been written with me in mind, the timing is perfect - thank you again!
ReplyDeleteDinah, IN
Thank you so much - you'll never guess what's on my sewing table - your timing is perfect! Such clear step by step instructions.
ReplyDeleteA beautiful tutorial, Pam. Such clear illustrations!
ReplyDeleteWonderful, clear tutorial with each step demonstrated perfectly. Thank you so much for generously sharing this technique.
ReplyDeleteWonderful, clear tutorial with photographs perfectly demonstrating each step. Thank you so much for so generously sharing your technique.
ReplyDeleteA beautiful tutorial, thank you for this.
ReplyDeleteI'm wondering if this same process can be used upside down, with somewhat larger pieces, to make the placket on a pullover shirt. Any reason why not?
Yes it can..though as you note the width of the pieces, especially the underlap will need to be wider. Also, you'll need to be careful that the placket opening matches the center front of the neckline. If you look at the picture where I show you the finished placket from the 'wrong side', you will see what I mean. Make a sample first to work-out the proportions. You may find that the "one-piece strip" placket that Kathleen Fasanella shows in one of her tutorials at www.fashion-incubator.com will work better as a neckline. I managed to find that link...here it is... http://www.fashion-incubator.com/archive/reverse_engineering_standard_work_pt51/
DeleteThe method Kathleen shows in that link is very clever and conceptually elegant, but compared to the perfect flatness and smoothness of the method here, the lump it makes at the triangle is huge. Worse, it's almost impossible to avoid distortions of the main fabric at the slash corners, so if you want a really clean, flat finish, I'd say skip it. But it does ensure that the over and underlaps are the same width, plus it automates getting the triangle balanced, despite the bulk there getting in the way. For quick and dirty, it's pretty cool:)
DeleteIf you want the laps to be equal widths AND flat, better I think to cut the opening as a box as Kathleen shows, but bind each long edge with a separate strip, both of which extend beyond the short edge at the bottom and get arranged on the garment right side, where the longer overlap is the only layer to get folded into the covering triangle (or squared, etc.)
The method here works best when the overlap is wider, even slightly, than the underlap, which looks cleaner to my eye, plus it let's you decide exactly how wide you want each layer to be (I'd want a wider CF placket than sleeve ones, for example). But this does mean that the center of the overlap is NOT going to be centered over the slash on the garment piece, so you have to determine with a test how much the one line is offset from the other with whatever widths you decide on, as well as cut and fold with careful precision to preserve the offset you measure...IF it's important to either center the overlap, or match the overlap pattern to the garment. If neither of these is crucial, you don't have to be so finicky. It's easy to work out the offset with a sample: just look to see when the slash falls in relation to the overlap center after folding, and remember that for centering, the slash is placed off-center by the offset, and when matching, the pattern on the overlap is off-center from the slash by the offset.
Thank-you David.....I appreciate you articulating in exquisite detail the CF issues that I could only allude to while being hooked up to this IV. (I'll be speaking with you on Wednesday or Thursday latest, to express my thanks for contributing to this discussion...among other things ;) ...would have emailed or texted this, but The Nurse has now forbidden me from doing anything more than laying here for the remainder of the day and is going to confiscate my little laptop.......party-pooper :)
DeleteThank you, Pam. This has been very helpful.
ReplyDeleteMaureen
Fabulous tutorial, as always, Pam. Yours are the gold standard.
ReplyDeleteSO helpful! Thanks for taking your time to make this a step-by-step for those of us new to shirtmaking.
ReplyDeleteAwesome tutorial! Thanks!
ReplyDeleteBeautiful instructions and photos!
ReplyDeleteI can not wait to try this! This makes more sense to me than any other tutorial on the subject I've seen! Thank you!!
ReplyDeleteMany thanks, Pam, for your excellent tutorial, I really appreciate you sharing your expertise. I have bookmarked this for future reference.
ReplyDeleteHow fun it is to see David contributing here - two experts sharing with us out here in blogland. I love it!
ReplyDeletePam, hope you will be home soon. I know from experience how boring hospital can be, but it sounds like you are on the mend :-)
ReplyDeleteThank you so much for the time and trouble you have taken here. This is the best explanation of a cuff placket that I have seen - much appreciated (and I'm sure my family will appreciate having perfect cuffs too :) )
ReplyDeleteI just tried this method and I'm thrilled with the result. Thank you so much for sharing your techniques. Your red shirt with the black denim trim inspired me to try putting some contrast in my shirt and I'm really pleased with it. Looking forward to reading more tutorials from you and trying them out. Thanks again.
ReplyDeleteWow! What a fabulous tutorial! With every tutorial you post, my shirtmaking gets better! Thank you so much for the time and effort you put into your tutorials. They are so clear and detailed.
ReplyDeleteWow - this is amazing!! I just tried it and am so impressed with the results. Thank you so much for this extremely detailed, well-written, and friendly tutorial! : )
ReplyDeleteHi, I found your tutorial and am very happy! I've just made two plackets to be proud of! I'll be checking out the rest of your site now.
ReplyDeleteThis is SO MUCH BETTER and easier than a continuous lap.....I'm speechless.
ReplyDeleteThis is the best tutorial I ever had !!! I really appreciated !!! Thank you!!!
ReplyDelete:P
Oh my gosh! You have no idea how many times I've sewn the placket on the wrong side. That little side, big side will forever stick in my head. And I doubt I'll ever sew another wrong again. I really, really like this method. Thank you!!
ReplyDeleteThank you! I've sewn several shoddy plackets, trying in vain to understand the instructions in my reference books and on YouTube. Never have I seen a tutorial that outlines the steps so clearly. I can't wait to try your method!
ReplyDeleteYou are an amazing teacher ! I hope you have more tutorials out there. I had about decided to just make all my grandsons shirts shortt sleeved. God bless you , and please keep up the good work.
ReplyDeleteNon ho parole....è tutto così facile bello e realizzabile grazie alle vostre spiegazioni così dettagliate...grazie!!!!
ReplyDeleteHi Pam
ReplyDeleteThis is a very clear and compelling tutorial. I'm almost excited to sew my plackets!
If I'm understanding correctly the upper end of the placket is left unfinished/not enclosed on the inside of the sleeve. Is that right? Is risk of fraying with repeated washing very low?
Hi! It may be a little hard to see even though I stitched with black thread....,but everything is completely enclosed...no raw edges. Specifically, look again at the last 2 photos. The one taken from the wrong side (inside) shows the under-placket tucked up/under/inside the folded "triangle/wedge", and held there by the top-stitching that you see in the next photo (of the placket from the right-side).
DeleteMy clients routinely have their shirts cleaned at commercial laundries where-ever they happen to be all over the world....and that usually means the shirts are not treated gently. So....it is imperative that the shirts we make in my shop have absolutely NO "loose bits" that could fray or become undone. :)
What presser foot is that being used in this tutorial? Thanks.
ReplyDeleteHello Myra......it is an 'open toe' foot.
DeleteGod bless you Pam!! this tutorial is a God sent because I am expanding my business and not include custom made shirts as part of the collection. This is one thing I didn't know how to do well and this tutorial has done more than I prayed for. Thank you so much. You're touching lives, even all the way here in South Africa.
ReplyDeleteThank you, thank you! I just tried this method yesterday on a shirt I'm sewing. I was TERRIFIED to make that cut! LOL But I held my breath and did it, then there was no turning back. It is far from perfect, but it is the best placket I've done to date! I am eager to do more. And I easily remembered the little placket/little side tip. You ROCK!
ReplyDeleteI have been struggling with a stupid BurdaStyle "Intermediate" pattern whose directions are terrible. This is a saving grace!!! You are the best!! Thanks for taking the time to post this for us learning to sew shirts!!! Now if only I'd had this before I attempted the 2-piece button placket flanked by several pintucks!! In case you're interested, I am nearly finished making the "Tunic 120" which is more like a dress. I'm using lightweight pink linen.
ReplyDeleteThank you so much, your illustrations are the best I have come across so far. you are the best
ReplyDeleteThank you so much for this clear and easy to follow set of instructions. Like many of the other readers I have been avoiding plackets, but love to wear them. I have tried another method published in an Australian magazine, but was not happy with the end result. I have just done my first pair following your instructions, not brilliant, but certainly better than anything I have done before. I am sure with practice they will improve. I am practising on some pretty (inexpensive) cottons before I cut into my beautiful Liberty print. I look forward to reading more of your informative blogs.
ReplyDeleteSo clear! So easy to follow! I've been struggling with plackets for years, and trawling for a decent tutorial for almost as long, but only just found this - your instructions are just perfect. Thank you so much!
ReplyDeleteI am making a man's shirt for my doll. Since I am doing a lot of work on this, I wanted to do the placket correctly. The directions on the pattern have no pix. This is wonderful wonderful. Thanks!
ReplyDeletePat
Fabulous tutorial. Thanks!!!!!
ReplyDeleteThis is such a wonderful article. Thank you for this information!
ReplyDeleteWonderful, clear and well presented directions make doing a sewing project a pleasure!
ReplyDeleteI wish the pattern companies could see what could be done with helpful directions then maybe more people would be interested in making clothing.
You are absolutely amazing! This is the best tutorial that I have ever seen!
ReplyDeleteI have been doing your style placket ever since I read your post this time last year. I love, love,love this method. I am now working on another shirt that has a continuous lap placket. I don't like it at all. Can I adapt this method to my pattern? I'm guessing I can use the same slit but draw my lines the way I would for a normal placket? Thank you so much for any help.
ReplyDeleteI think I saw this tutorial in spanish. Was I dreaming? Or was a good translation? Nevermind, I still understand it in english, but english is not my language, but photos help a lot. Thanks
ReplyDeleteThis is the best tutorial I've come across. Your instructions were very clear and left nothing to the imagination. Thank you and you are so right this method is way easier than the ones on patterns. I remember my first shirt I made and this was the method used so, on subsequent patterns for shirts they used other methods and I couldn't find my pattern I had first used and of course! my sleeves were disasters....ugh! Thanks again!
ReplyDelete